
Showing posts with label skeleton. Show all posts
Showing posts with label skeleton. Show all posts
Wednesday, April 14, 2010

Tuesday, March 16, 2010
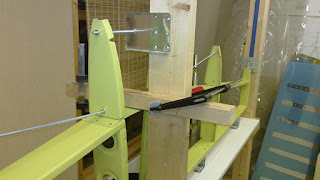
Adjusted the skeleton in the jig
Measured up the skeleton in the jig and fastened it with clamps and long bolts. The tip flanges will be riveted into the tip ribs when the skins are on.


Sunday, March 14, 2010

Tuesday, March 2, 2010


Wednesday, February 3, 2010
Tuesday, June 2, 2009
Riveted on the rudder skin
The rudder skin is riveted on the rudder skeleton. I used Cherrymax rivets on the control horn. I need to get a pipe wrench tomorrow to bend the leading edge into shape. I thought I could do it by hand, but it is way too strong and I just can't get a good grip on the pipe.


Sunday, April 12, 2009
Elevator skeleton and priming
Made the skeleton for the right elevator. Primed the skin, stiffeners, skeleton and the rest of the bits for the rudder.


Tuesday, April 7, 2009
Drilling the rudder
Marked all lines and holes and drilled the rudder skin to the skeleton. Also made the strips to fasten the fiberglass trimming and details.


Sunday, December 7, 2008
Rudder skeleton riveted
Riveted together the rudder skeleton. At first it seems like the rudder is fastened to the rod end bearings with only two rivets each, so that only six 2/16 rivets are holding the whole rudder. But when looking just a bit more closely, the rod ends are really holding the rudder with the bearings and the rod end nut squizing the plates and spar together. The six rivets are only there to keep the jam nut positioned. Nice design.
The jam nuts on the rudder seemed to be bare steel, so I primed them using the zinc chromate rattle can.

The jam nuts on the rudder seemed to be bare steel, so I primed them using the zinc chromate rattle can.

Monday, November 24, 2008
Primed the rudder skeleton
Primed the rudder skeleton parts with the P05 Strontium Chromate Epoxy. The aluminum plate from Sweden arrived within a couple of days last week.


Friday, October 17, 2008

Wednesday, May 28, 2008
VS Skeleton ready for deburring/priming
After measuring and measuring again and ... the skeleton is ready for deburring and priming. The main spar must be installed in the jig.
Found another error in the manual/drawings, or at least something that is very easy to misinterpret and get wrong. In the drawings, the angles for the ribs are measured from the main spar. The hinge line on the VS is NOT parallel to the main spar, so when installed in the jig, repositioning the temporary hinges from the HS (as per the manual), the 5/8 inch offset of the HS-406 tip measured with a "water bulb thing" (as per fig 6.12 in the manual), cannot be correct. It has to be MORE than 5/8 to compensate for the offset hinge line, or the 93 degree angle will only be 90-91 degree. It looks like this has caused some confusion earlier, because the manual states that the drawings have been checked and rechecked and ARE correct. So this means that the manual is wrong. At least it mentions nowhere the importance of installing the spar in the jig so it is absolutely horizontal, or to compensate for the unparallel hinge line when using the hinges with no shimming on the jig.


Found another error in the manual/drawings, or at least something that is very easy to misinterpret and get wrong. In the drawings, the angles for the ribs are measured from the main spar. The hinge line on the VS is NOT parallel to the main spar, so when installed in the jig, repositioning the temporary hinges from the HS (as per the manual), the 5/8 inch offset of the HS-406 tip measured with a "water bulb thing" (as per fig 6.12 in the manual), cannot be correct. It has to be MORE than 5/8 to compensate for the offset hinge line, or the 93 degree angle will only be 90-91 degree. It looks like this has caused some confusion earlier, because the manual states that the drawings have been checked and rechecked and ARE correct. So this means that the manual is wrong. At least it mentions nowhere the importance of installing the spar in the jig so it is absolutely horizontal, or to compensate for the unparallel hinge line when using the hinges with no shimming on the jig.


Tuesday, May 27, 2008
Skeleton on the VS
Continuing with the skeleton on the VS. Lots of measuring and odd angles. Have to order some wires for lights. I think I will use LED instead of bulbs.


Saturday, January 5, 2008
HS measured and ready for skinning
Trimmed the skins so they fitted in the jig. Measured and clamped the skeleton into the jig. Made an additional fasteners so that the HS-405 ends will have correct distance from each other and from the CL. Temporary fastened the HS-407 with wood to prevent them from bending while fitting the skins. Marked centerlines and measured distances for rivet lines onto the jig.
Have to make some paper templates to prevent drilling into the fluting, otherwise everything is ready for skinning.
Now I thing I start to understand the reason for pre-punched skins.


Have to make some paper templates to prevent drilling into the fluting, otherwise everything is ready for skinning.
Now I thing I start to understand the reason for pre-punched skins.


Wednesday, December 19, 2007
Finished bucking the skeleton
Did the last few rivets on the skeleton of the HS. Had to drill out two rivets that were bad, but it is remarkable how fast one learn using the rivet gun. Also riveted on the 404 spars, and this results in using pop-rivets on the 407 spar/skin interface. Pop rivets doesn't look so nice as flush solid rivets, but it will be easier to get it properly done, nice and straight and good riveting. I think I will chose that path as a general rule in the future as well - higher probability of succeding with a good solution the first time before beauty, he he.
Found out that the HS-410 was a mm or so too large in the ends so it would interfere with the skin. Should have seen this long ago, but didn't, so had to file down the ends, polish and prime (with Zinc Chromate).


Found out that the HS-410 was a mm or so too large in the ends so it would interfere with the skin. Should have seen this long ago, but didn't, so had to file down the ends, polish and prime (with Zinc Chromate).


Tuesday, December 18, 2007
Bucking for the first time
Started to rivet together the skeleton and found out that some of the rivets must be bucked on because the rivet hand press just did not fit. Did some practicing on scrap metal.
Saturday, November 24, 2007
HS skeleton ready for deburring and priming
Lots of hard to reach drilling and difficult alignments (3 pieces needs to be aligned simultaneously horiz, vert and in angle before drilling). Still need to check the angle of the 406 ribs, they shall be perpendicular to the aft spar and parallel, but no tolerances are given. Mine have a slight angle outward so I may have to make new flanges on the fwd spar, but when the 406 ribs are not a perfect shape, and I do not know the tolerances, this may be unnecessary?.


Friday, November 23, 2007
HS skeleton
The skeleton is coming together. Lots of very hard to reach drilling. The angle drill from Averytools comes in handy.


Subscribe to:
Posts (Atom)